Load Balancer
In our OpenStack deployment, there is a load balancer implementation called Octavia.
Load balancers can be configured via the CLI or the web interface.
In the background, a pair of VMs (called Amphoras) with HAProxy and Keepalived is started, sharing the public IP as a VIP (Virtual IP).
This is intended to be a brief introduction to the technology and to show how it can be used in our cloud. More detailed information can, for example, be found in the Octavia Cookbook.
Szenario
Here, we choose a simple scenario to focus on the general setup and demonstrate how it integrates into our cloud.
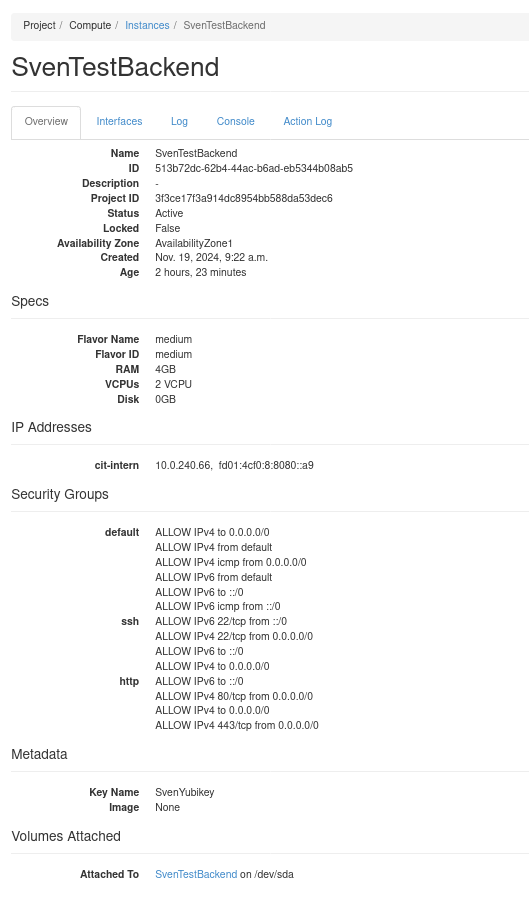
So, let’s assume we have one or more simple HTTP backend servers located in one of the internal subnets, likely *-intern, and we want to create a load balancer with an external IP from the *-public subnet.
For simplicity, we will now use only one backend server.

As can be seen from the image, this server is located in the cit-intern subnet, and the security groups are configured to allow connections to the HTTP server.
If necessary, this can also be further restricted to the cit-intern network.
Creating the Load Balancer
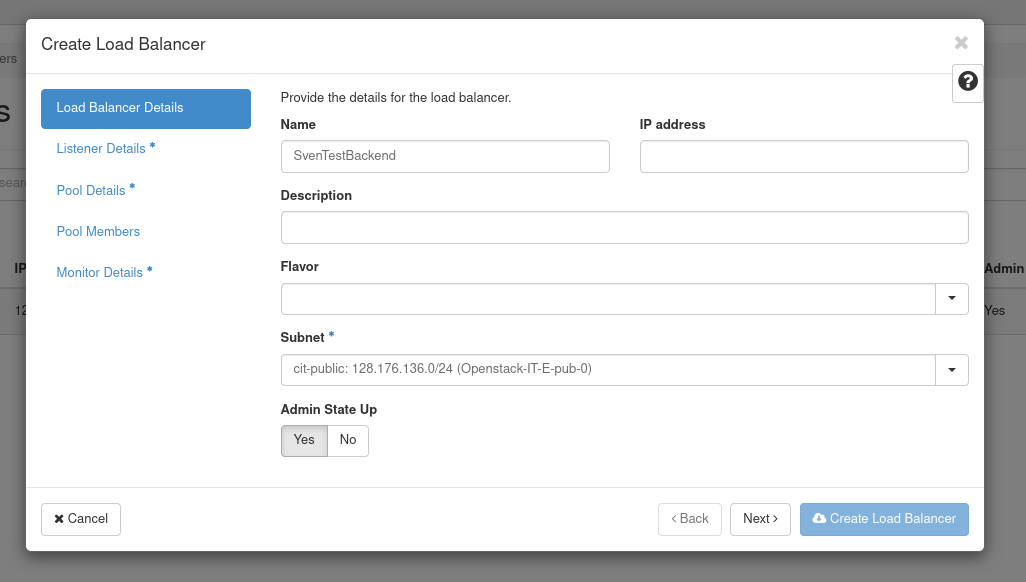
To create a load balancer, we go to the Network->Loadbalancer tab and start the wizard by clicking the Create Load Balancer button.
First, we need to choose a name for our load balancer and decide in which subnet the VIP will be located.
If we already know an IP address, we can enter it here.
For this example, we choose the cit-public subnet for our VIP.
This may vary, but in most cases, it will be one of the ivv*-public subnets.

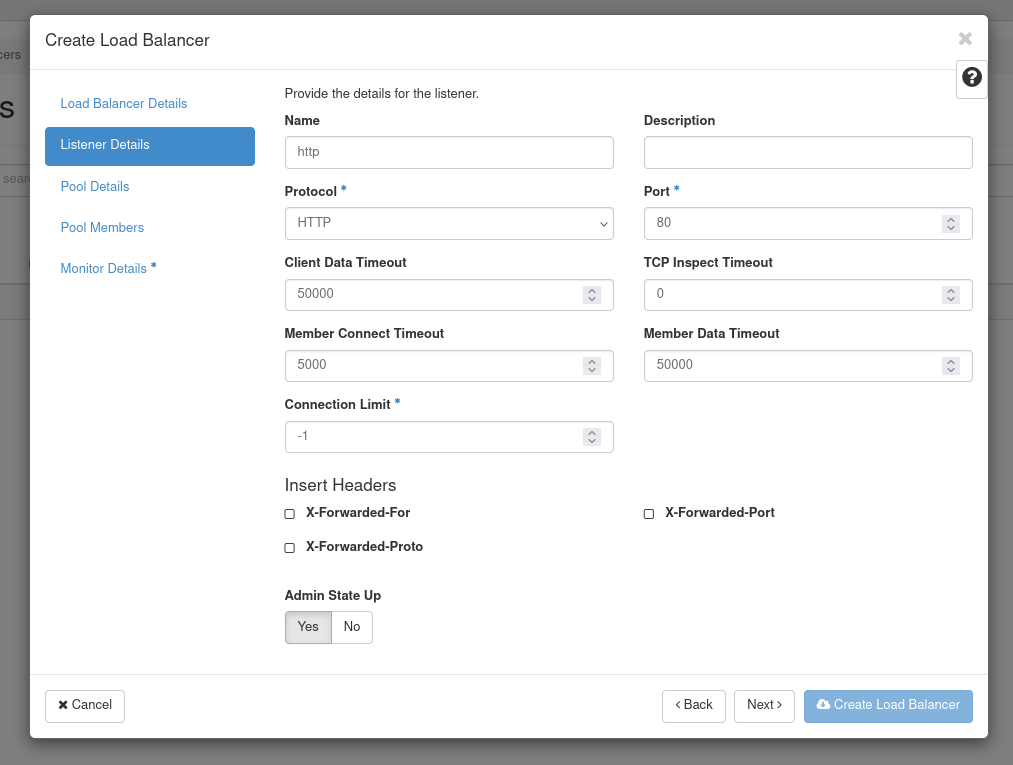
Next, we configure the listener.
A listener is a component of the load balancing service that handles incoming client requests.
It listens on a specified port and protocol (e.g., HTTP, HTTPS, TCP) and forwards these requests to the appropriate backend pool of servers.
In our case, we create a listener named http that can accept HTTP requests on port 80.
Multiple listeners can also be added to the load balancer later on.

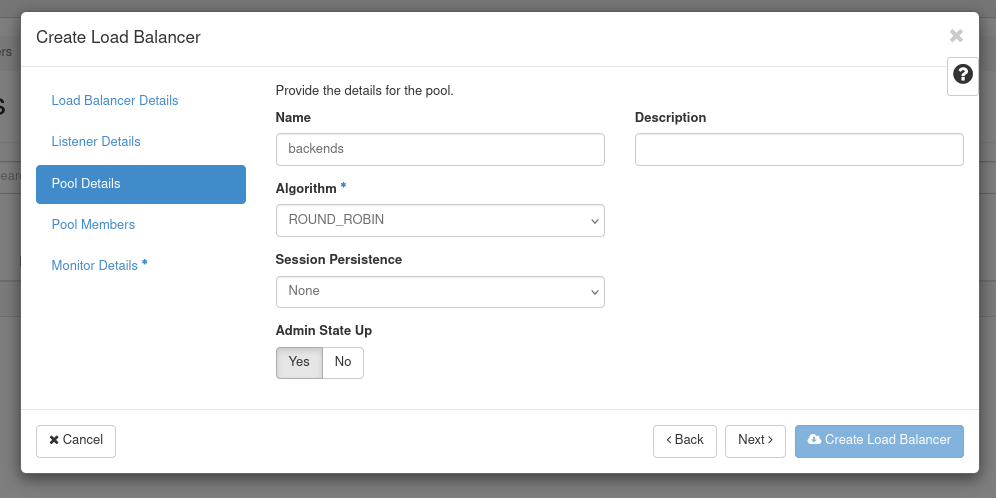
Next, we configure the pool.
A Pool is a collection of backend servers that handle incoming traffic forwarded by a load balancer listener.
The pool is responsible for distributing client requests across these backend servers to ensure efficient load balancing.
In our case, we create a pool named backends that distribute the traffic via round robin to its members.
Multiple pools can also be added to the load balancer later on.

After the pool is created, we can assign members from our project. We also need to specify the respective port for the members. In our case, it is port 80.
We can select these members from a list, but we can also manually configure external members.

Finally, we can configure a health monitor. A health monitor is used to check the health and availability of the pool members in a load balancing pool. It ensures that traffic is only sent to healthy pool members, improving reliability and preventing requests from being routed to servers that are down or unresponsive.
In our case, we know that the pool members should return a 200 status code on port 80 and the / path, so we configure this as our health check.

Now that the wizard is complete, we can click the “Create Load Balancer” button to create the load balancer.
Our load balancer should now appear on the overview page:

And once it switches to Online and Active, it should also start accepting connections:
❯ curl http://128.176.136.207 -v
*   Trying 128.176.136.207:80...
* Connected to 128.176.136.207 (128.176.136.207) port 80
* using HTTP/1.x
> GET / HTTP/1.1
> Host: 128.176.136.207
> User-Agent: curl/8.10.1
> Accept: */*
>
* Request completely sent off
< HTTP/1.1 200 OK
< server: nginx/1.22.1
< date: Tue, 19 Nov 2024 13:04:02 GMT
< content-type: text/html
< content-length: 615
< last-modified: Tue, 19 Nov 2024 11:09:09 GMT
< etag: "673c71d5-267"
< accept-ranges: bytes
<
<!DOCTYPE html>
<html>
<head>
<title>Welcome to nginx!</title>
<style>
html { color-scheme: light dark; }
body { width: 35em; margin: 0 auto;
font-family: Tahoma, Verdana, Arial, sans-serif; }
</style>
</head>
<body>
<h1>Welcome to nginx!</h1>
<p>If you see this page, the nginx web server is successfully installed and
working. Further configuration is required.</p>

<p>For online documentation and support please refer to
<a href="http://nginx.org/">nginx.org</a>.<br/>
Commercial support is available at
<a href="http://nginx.com/">nginx.com</a>.</p>

<p><em>Thank you for using nginx.</em></p>
</body>
</html>
* Connection #0 to host 128.176.136.207 left intact
Of course, the load balancer must also be registered in NIC Online, see NIC Database Entry . A DNS name can also be assigned there.
Of course, there are many other configuration options, but they cannot be covered here. Therefore, we once again refer to the official documentation.
More detailed technical information
Information about listeners, pools, members, and monitors is visible and editable for all users. Unfortunately, additional details about the Amphoras and their associated servers can only be accessed by administrators for security reasons.
However, to give an idea of what this looks like, here is an example output:
root@570f2c9ad7d6:/# openstack loadbalancer amphora list --loadbalancer SvenTest --long
+--------------------------------------+--------------------------------------+-----------+--------+---------------+-----------------+--------------------------------------+-------------------+--------------------------------------+
| id | loadbalancer_id | status | role | lb_network_ip | ha_ip | compute_id | cached_zone | image_id |
+--------------------------------------+--------------------------------------+-----------+--------+---------------+-----------------+--------------------------------------+-------------------+--------------------------------------+
| bc3a91df-717b-4ec7-977d-e6137f69a634 | 325d4944-ef76-4f64-836d-23a7e4f66707 | ALLOCATED | BACKUP | 10.52.12.236 | 128.176.136.207 | 8a28ecfb-fa64-4ee6-95ad-eaee660a33fd | AvailabilityZone1 | 29553d66-c0aa-4feb-877d-aa7951a9e599 |
| ce3e6fb8-9710-44d6-a0a6-8b9631d490a3 | 325d4944-ef76-4f64-836d-23a7e4f66707 | ALLOCATED | MASTER | 10.52.12.154 | 128.176.136.207 | 05d77e29-b4d4-4ff4-b9e0-fd3753c25f9c | AvailabilityZone1 | 29553d66-c0aa-4feb-877d-aa7951a9e599 |
+--------------------------------------+--------------------------------------+-----------+--------+---------------+-----------------+--------------------------------------+-------------------+--------------------------------------+
root@570f2c9ad7d6:/# openstack server show 05d77e29-b4d4-4ff4-b9e0-fd3753c25f9c
+-------------------------------------+------------------------------------------------------------------------------------------------------------------------------------------------------------------------------------------+
| Field | Value |
+-------------------------------------+------------------------------------------------------------------------------------------------------------------------------------------------------------------------------------------+
| OS-DCF:diskConfig | MANUAL |
| OS-EXT-AZ:availability_zone | AvailabilityZone1 |
| OS-EXT-SRV-ATTR:host | wwusddc1047.uni-muenster.de |
| OS-EXT-SRV-ATTR:hostname | amphora-ce3e6fb8-9710-44d6-a0a6-8b9631d490a3 |
| OS-EXT-SRV-ATTR:hypervisor_hostname | wwusddc1047.uni-muenster.de |
| OS-EXT-SRV-ATTR:instance_name | instance-00a5b639 |
| OS-EXT-SRV-ATTR:kernel_id | |
| OS-EXT-SRV-ATTR:launch_index | 0 |
| OS-EXT-SRV-ATTR:ramdisk_id | |
| OS-EXT-SRV-ATTR:reservation_id | r-uzoxyee8 |
| OS-EXT-SRV-ATTR:root_device_name | /dev/sda |
| OS-EXT-SRV-ATTR:user_data | None |
| OS-EXT-STS:power_state | Running |
| OS-EXT-STS:task_state | None |
| OS-EXT-STS:vm_state | active |
| OS-SRV-USG:launched_at | 2024-11-19T11:28:33.000000 |
| OS-SRV-USG:terminated_at | None |
| accessIPv4 | |
| accessIPv6 | |
| addresses | cit-intern=10.0.240.241, fd01:4cf0:8:8080::37a; cit-public=128.176.136.65; octavia=10.52.12.154, 2001:4cf0:8:ff02::105 |
| config_drive | True |
| created | 2024-11-19T11:28:09Z |
| description | amphora-ce3e6fb8-9710-44d6-a0a6-8b9631d490a3 |
| flavor | description=, disk='3', ephemeral='0', , id='octavia', is_disabled=, is_public='True', location=, name='octavia', original_name='octavia', ram='1024', rxtx_factor=, swap='0', vcpus='1' |
| hostId | ae5abb3c907d06354b2b49dce624492f9cda858b0b22e21b92f6762c |
| host_status | UP |
| id | 05d77e29-b4d4-4ff4-b9e0-fd3753c25f9c |
| image | Octavia Train Focal 2024-06-07-362920 (29553d66-c0aa-4feb-877d-aa7951a9e599) |
| key_name | None |
| locked | False |
| locked_reason | None |
| name | amphora-ce3e6fb8-9710-44d6-a0a6-8b9631d490a3 |
| pinned_availability_zone | None |
| progress | 0 |
| project_id | fd5c2d4228734251805338ced476b675 |
| properties | |
| security_groups | name='default' |
| | name='lb-325d4944-ef76-4f64-836d-23a7e4f66707' |
| | name='default' |
| | name='octavia' |
| server_groups | ['af1cce35-378b-4cc6-8083-7b3e08c1c6e9'] |
| status | ACTIVE |
| tags | |
| trusted_image_certificates | None |
| updated | 2024-11-19T11:28:33Z |
| user_id | 4bf63da165cb45b8a7b6698321f0082f |
| volumes_attached | |
+-------------------------------------+------------------------------------------------------------------------------------------------------------------------------------------------------------------------------------------+